Nuxsol
Start a conversation

Worknuxsol.eu/work/h8-touchscreen/

A new touchscreen for an espresso machine.

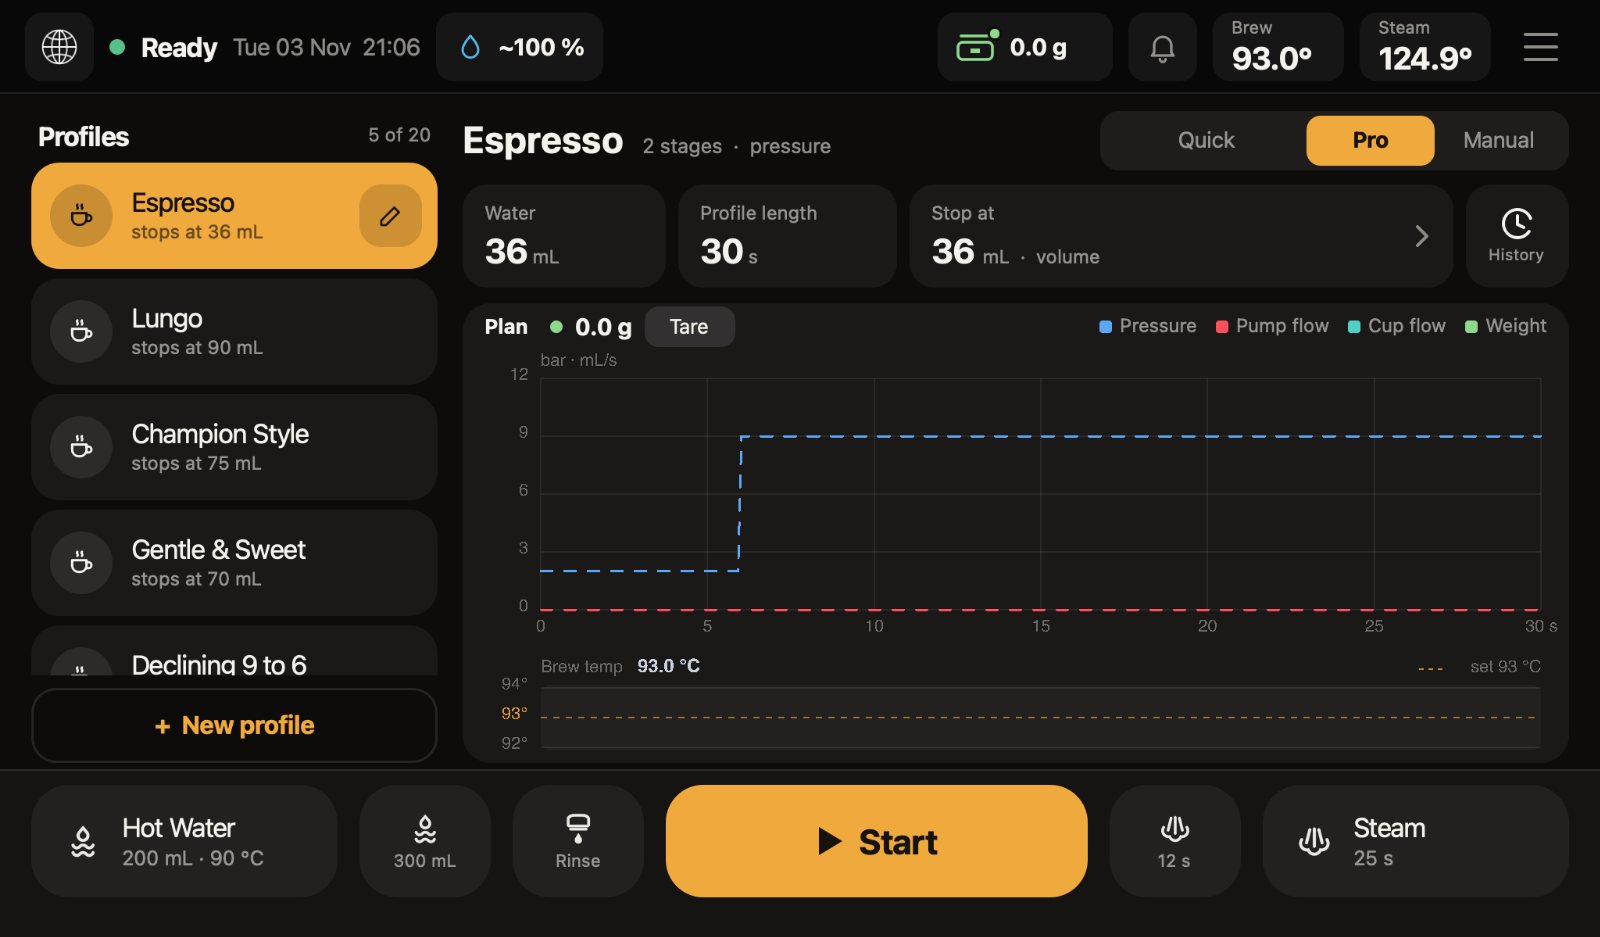
The interface of the H8 espresso machine, designed and rebuilt by Nuxsol: profiles, a live shot chart, a recipe editor and every setting, on the machine’s own 1024 × 600 screen.

The Pro screen of the H8 touchscreen: profiles on the left, the plan for an espresso as a chart, and the dock with Start at the bottom.
The Pro screen: profiles on the left, the plan for the selected shot, and Start in the dock.
Sector
Product interface
Year
2026
Project
Vellutto H8
Client
Vellutto
Interface design
Nuxsol
Code and development
Nuxsol

The H8 is a high-end espresso machine that Vellutto sells to home baristas across the EU and EEA. Its touchscreen decides how the machine feels to use every morning. Nuxsol designed a new interface for it and wrote the code that runs on the machine, without touching the software that controls the pump, the boilers and the valves.

In the project

  • Interface for the 1024 × 600 touchscreen
  • Pro, Quick and Manual brewing screens
  • Live shot chart and after-shot summary
  • Recipe editor with stages
  • Temperature, water tank, alarm and service screens
  • Desktop preview rig
  • Installable update package

The case

The problem

An espresso machine is used standing up, often before the first coffee of the day, with one hand free. The H8 has a 1024 × 600 touchscreen and a lot to say: two boiler temperatures, a scale, a water tank, pressure and flow profiles with several stages, and a full set of cleaning and service tasks. The factory interface showed most of it, but not in an order a barista could follow at a glance, and some of it was hard to reach.

There was one firm limit. The machine’s controller, the software that runs the pump, the boilers and the valves, had to stay exactly as it was. A new interface could change what the barista sees and touches, never what the machine does.

What we built

We designed the interface around three ways of brewing. Quick is a grid of saved drinks. Pro shows the profiles, the plan for the selected shot and a live chart once it pours. Manual gives the barista the pump directly, with a fader for pressure or flow. A dock at the bottom keeps hot water, rinse, steam and the main button in the same place on every screen, and a status bar keeps the temperatures, the scale and the water level in view.

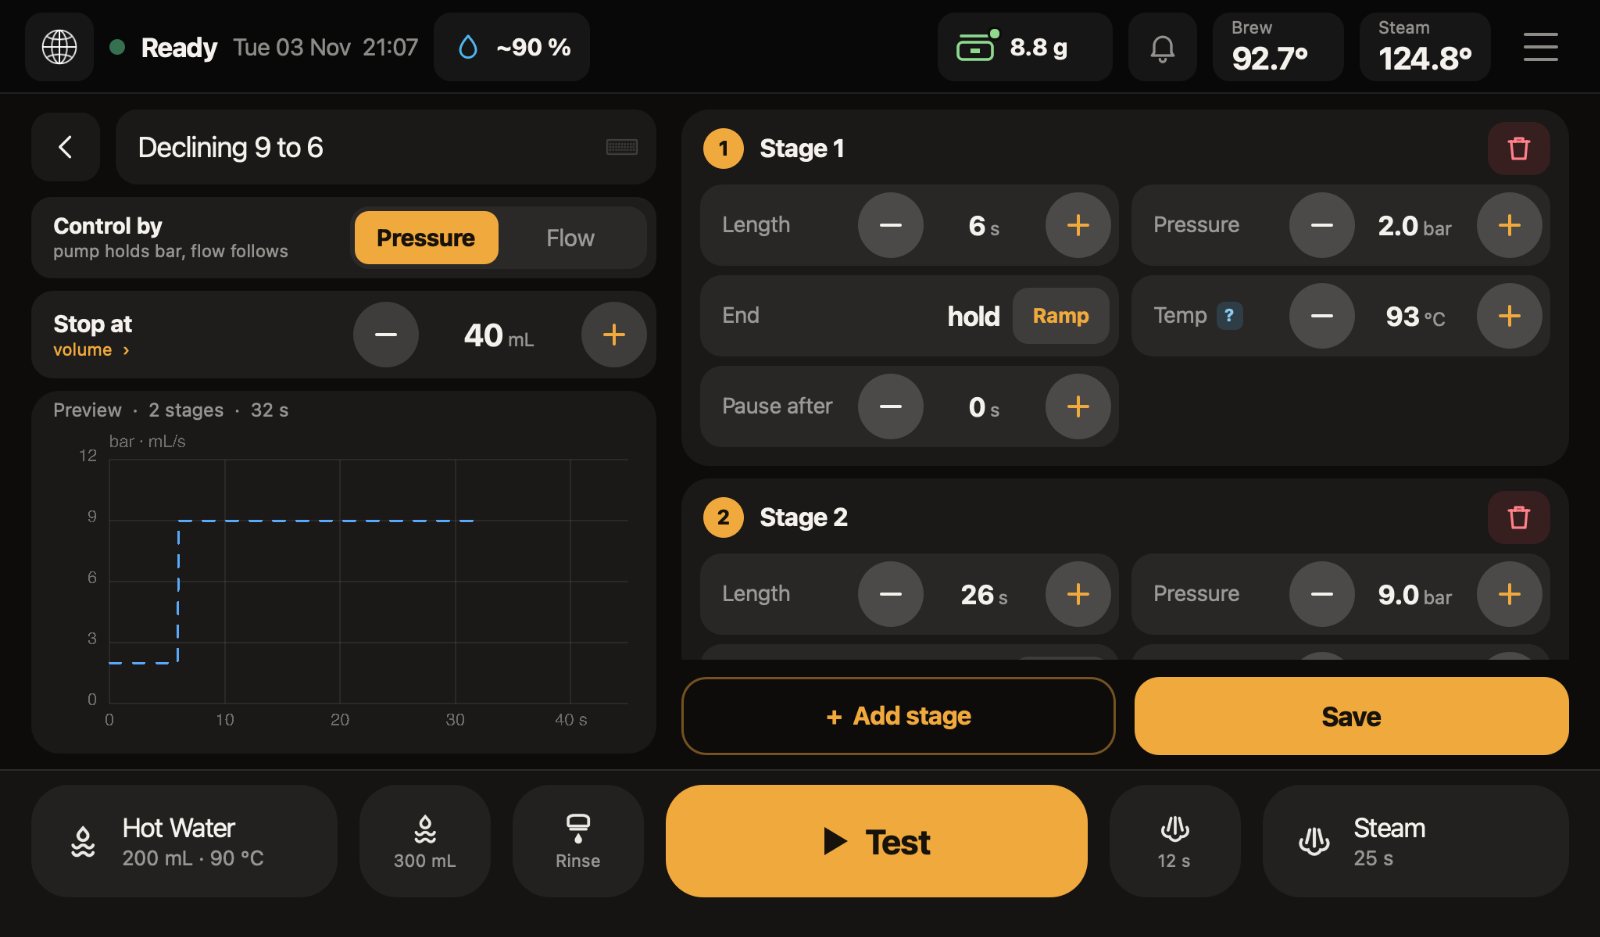
The recipe editor treats a profile as a row of stages. Each stage sets its own length, pressure or flow, temperature and pause, and can hold or ramp to the next. The temperature sheet, the water tank, alarms, eco mode, the screensaver, languages, the quick guide and the passcode-protected service pages were redrawn in the same system.

We wrote it in Qt QML, the toolkit the machine already runs, and bound it to the machine’s existing data and commands. A desktop rig renders the same compiled interface with a simulated machine, so each build was checked screen by screen before it went onto a USB stick and into the machine.
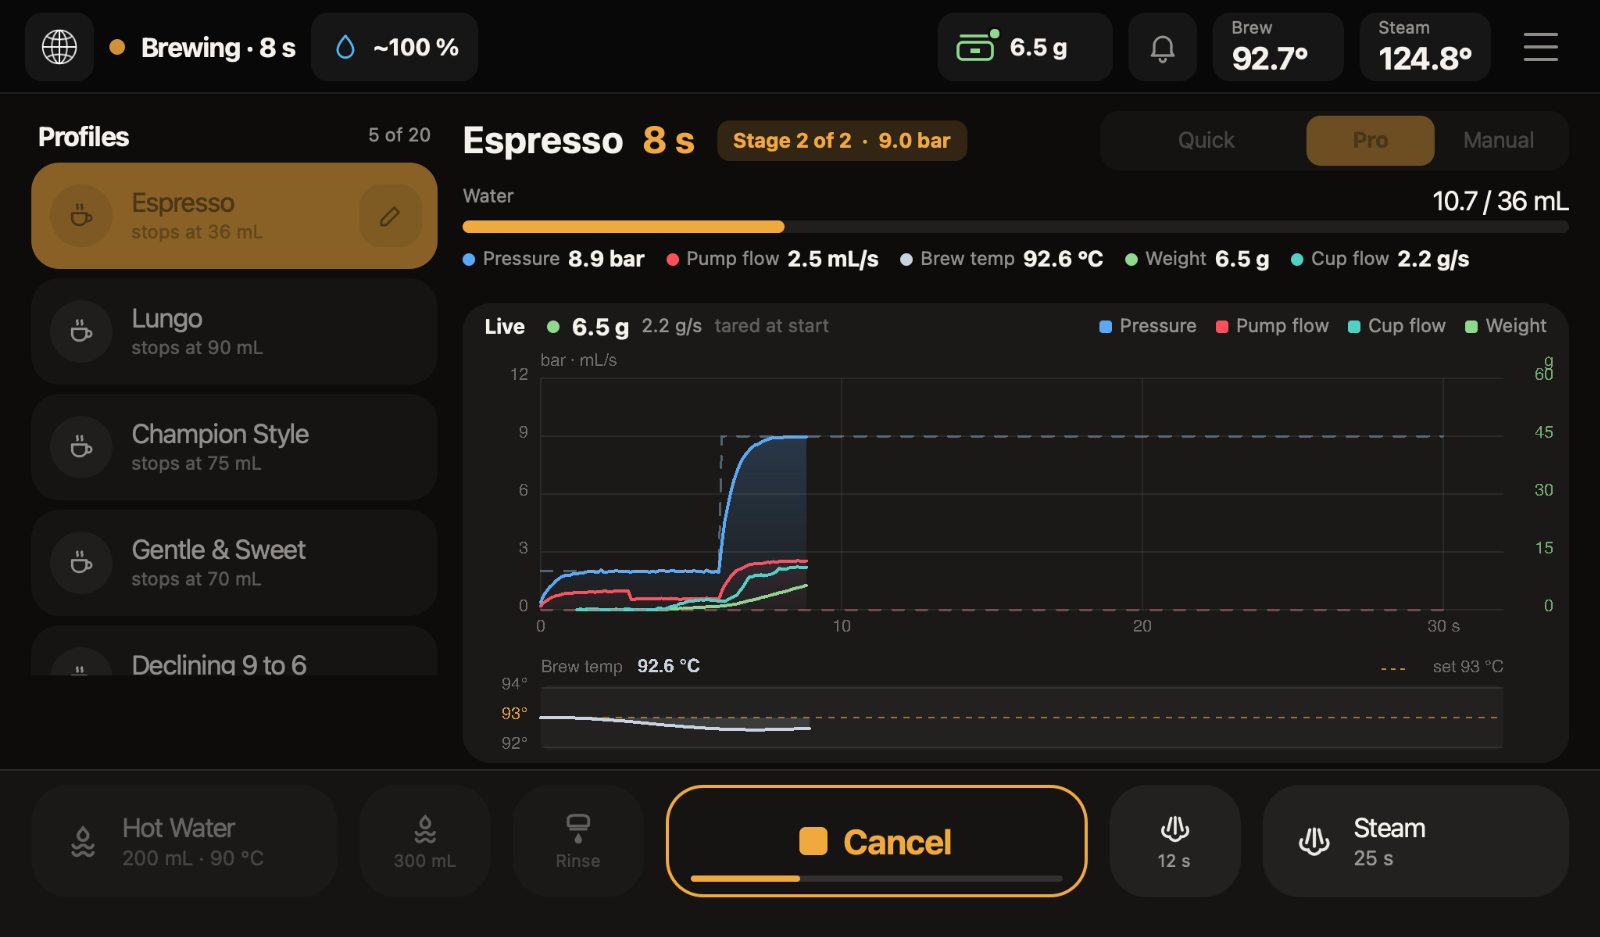
The H8 touchscreen during a shot, with pressure, flow and weight drawn live on a chart and a Cancel button in the dock.
During a shot: pressure, flow and weight drawn live, with the stage and the water used above.

Who it is for

  • The home baristaStands at the machine with a cup in one hand. Needs to start a shot, see how it runs and repeat a good one, from arm’s length.
  • The barista who experimentsChanges pressure, flow and temperature stage by stage. Needs every number visible and adjustable without a menu dive.
  • The owner and serviceNeeds cleaning, descaling, maintenance and machine settings in one place, behind a passcode where it matters.

What we did

By service: what was used in this project, and the steps of execution.

Product design

Complex products, made to feel simple.

UI and UX that make complex products feel simple. We balance what users need with what the business needs, so the product just works.

  • User interface
  • User experience
  • Design systems
  • Prototypes
  • Dashboards
  1. 01

    Map the tasks

    Every action the barista and the service technician take, from the first shot of the day to descaling.

  2. 02

    Design the screens

    Pro, Quick, Manual, the editor and every overlay, drawn at the screen’s real size of 1024 × 600.

  3. 03

    Build a component set

    Buttons, steppers, sliders, switches, inputs and progress bars, in one dark palette with one amber signal.

  4. 04

    Prototype in the browser

    A clickable HTML prototype showed exactly how the screens would look on the machine before any code ran on it.

Development

The design, built exactly.

Clean code that brings the design to life: fast, responsive and exact on every device, with a back end you can rely on.

  • Front-end
  • Qt and QML
  • Embedded Linux
  • Performance
  1. 01

    Rebuild the interface in QML

    The prototype turned into Qt QML screens and shared widgets, bound to the machine’s existing data and commands.

  2. 02

    Preview on a desktop

    A preview rig renders the same compiled interface on a laptop, with a simulated machine, so every screen and state could be checked without installing it.

  3. 03

    Package the update

    The new interface goes into the machine’s own update package, installed from a USB stick like a factory update.

  4. 04

    Install, test, repeat

    Each build was installed on the machine, checked by the owner, and fixed before the next.

Design decisions

Each with the reason for it.

  1. 01

    One screen per way of brewing.

    Quick is a grid of saved drinks, one tap each. Pro shows the profiles, the plan and the live chart. Manual hands the pump to the barista with a fader. A switch at the top moves between them on every screen.

  2. 02

    The dock never moves.

    Hot water, rinse, steam and the main button sit in the same place on every page. The main button changes with the moment: Start, Cancel, Test.

  3. 03

    Read it from arm’s length.

    Brew and steam temperatures, scale weight and the water level sit in the status bar on every screen, set large. Labels stay small; numbers carry the weight.

  4. 04

    Each line on the chart gets its own room.

    Pressure, pump flow, cup flow and weight are drawn on one time axis, each with its own colour and scale, so the values never print on top of each other.

  5. 05

    Edit a profile where you see it.

    The pencil on the selected profile opens the editor for that profile. Stages are cards with their own length, pressure or flow, temperature and pause, and a preview chart redraws as they change.

    BeforeIn the factory interface the edit button could freeze the screen.

  6. 06

    The controller stays untouched.

    The machine’s own control software, settings and safety logic were not changed. Only the interface was replaced, and every build was checked so that the interface is the only part that differs.

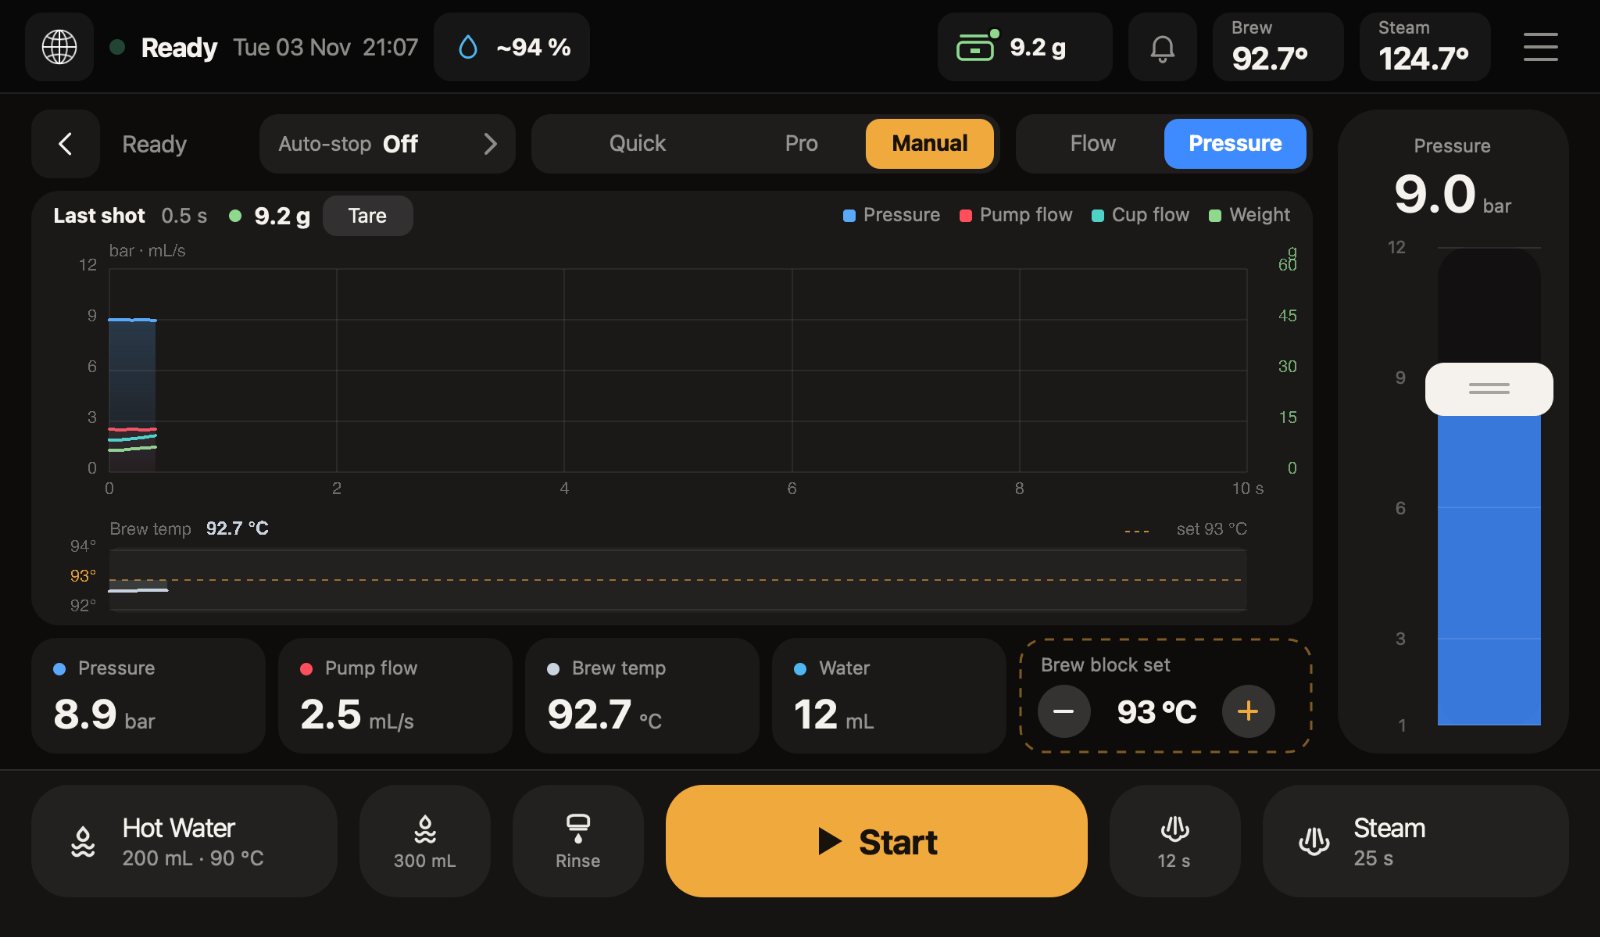
The Manual screen of the H8 touchscreen with a vertical pressure fader and live readings.
Manual: the barista sets the pressure with a fader while the chart runs.
The recipe editor of the H8 touchscreen, with two stage cards and a preview chart.
The recipe editor: each stage is a card, and the preview redraws as it changes.

The system

Four tones, each with one job. Contrast is measured, not judged by eye.

  • Ground#000000Black: the screen behind every page, so the machine reads as one dark object.
  • Ink#FFFFFFWhite: readings, labels and icons.
  • Signal#F0A93CAmber: the main button, the selected profile and the value being changed.
  • Soft#1E1E1EDark grey: cards, steppers and the dock.
Contrast ratios of the palette
PairContrastPasses
Ink on ground21.0 : 1AAA
Ink on soft16.7 : 1AAA
Label on signal9.3 : 1AAA
Signal on ground10.4 : 1AAA
Type
One sans-serif typeface. Readings are set largest, labels small and quiet.
Voice
Short labels that name the reading and its unit.

How it works

  1. 01

    Choose

    Pick a profile from the rail on the left, or a saved drink in Quick.

  2. 02

    Brew

    Press Start. The chart draws pressure, flow and weight live, and shows the stage it is in.

  3. 03

    Stop

    The shot stops at the volume or weight the profile sets, or when Cancel is pressed.

  4. 04

    Review

    The after-shot card shows time, weight in the cup, water used, brew temperature and what stopped the shot.

  5. 05

    Adjust

    Open the profile, change a stage, press Test, and save when it pours right.

The principle

Change what the barista sees. Leave what the machine does exactly as it was.

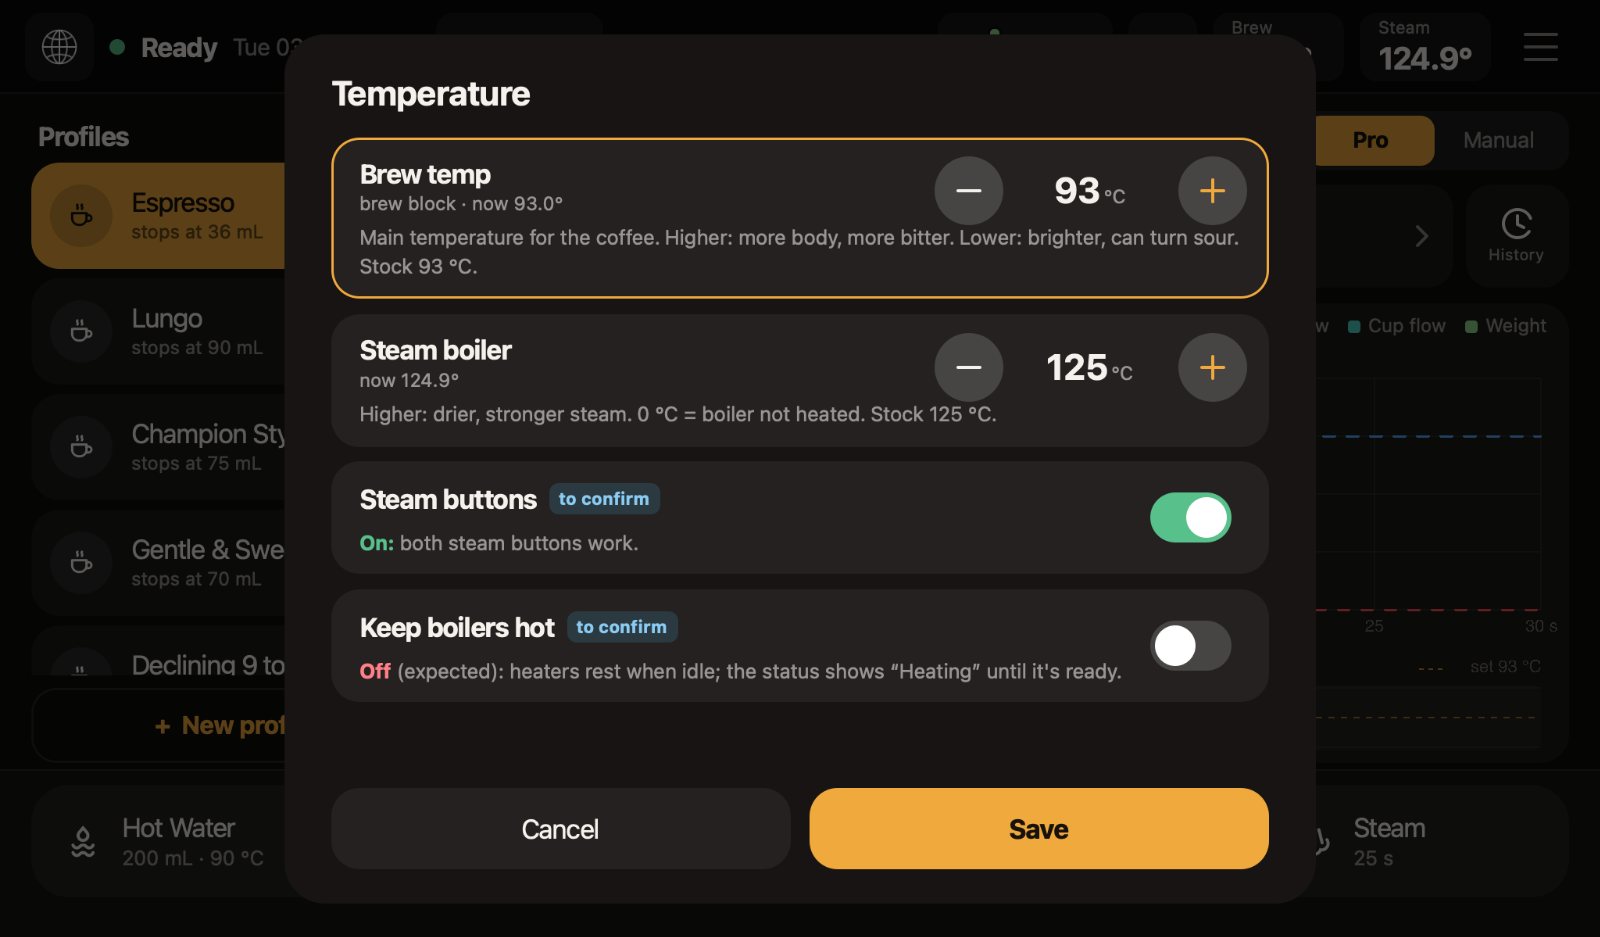
The temperature sheet on the H8 touchscreen with steppers for brew temperature and the steam boiler.
The temperature sheet, opened from the status bar: brew temperature, steam boiler and two switches.

What it is built to change

  • Confirmed on the machineEach build was installed on a real H8 and checked by the owner before the next one was made.
  • Only the interface changesEvery update package was compared with the factory package: the control software is identical, only the interface differs.
Next case This site.

Show us the page you want machines to understand.

Send us one URL. On the first call we tell you, for free, what a person and an agent each find there, and roughly what it would take to fix.